
Sunday, September 6, 2009
Monday, August 31, 2009
Take the time to see the Beauty...
Today I just wanted to share with you this inspiring story:
A man sat in Washington DC station and began playing the violin. It was a cold morning in January. He played 6 music pieces by Bach for about 45 minutes. Meanwhile, as it was a rush hour, it was estimated that several thousand people had passed through the station, mostly on their way to work.
After 3 min, a middle-aged man noticed the musician was playing. He slowed down for a few seconds, then accelerated to make up for lost time.
1 minute later, the violinist received his first dollar tip: one woman threw some cash, without stopping and continued walking.
A few minutes later, someone leaned against the wall to listen, but looked at his watch and left. He was obviously late for work.
A 3 year old boy was the only one who gave heed. His mother dragged, hurried, but the boy stopped to look at the violinist.
Finally the mother dragged him even more and the child continued walking, looking all the time behind him. This action was repeated by several other children. All parents, without exception, forced them to move forward.
During the 45 minutes when the musician played, only 6 people stopped and stood for a moment. About 20 people gave him money, but continued to walk normally.
He received $32. When he stopped playing and silence resumed, no one noticed. No one applauded or showed a sign of recognition.
Nobody knew the violinist Joshua Bell was one of the best musicians in the world. He played one of the most difficult music pieces ever written, with a violin worth 3.5 million.
2 days before playing at the station, he played sold-out in a theater in Boston, where the seats had been sold on average $100 each.
This is a true story. Joshua Bell playing incognito in the train station was part of an experiment organized by the Washington Post, on people's perception, taste and priorities.
The questions were: Do we perceive beauty? Do we stop to appreciate it? Do we recognize the talent in an unexpected context?
One possible conclusion to such an experiment could be this: If we do not have time to stop and listen to one of the best musicians in the world playing the best music ever written, how many other things do we miss?
Friday, August 7, 2009
Video tutorial- how to decopatch a paper mache giraffe
Ok, finally I'm done with the video. I really hope it will help you achieve your decoration of paper mache items. I had real fun doing this (the decoupage part). Working on the creation of the video is a lot less fun, it's more work actually ;-). Yes work because believe it or not I had to do it. I'm starting going crazy with all the stuff I have to know/do to keep the store functioning, evolving, etc.
This summer I have slow down more than usual. I know, a few of you asked me what was going on with the videos. I do not promise but I will do my best to post more often and to create more videos in the coming weeks (or months should I say).
I will also put a higher emphasize on the Home Deco range, like the MDF figurines. There are so many nice stuff you can create with. And just like decopatch, once you start you become addicted to!
So here's the video from the previous step-by-step project. Don't forget to let me your comments. It helps me provide more useful vids and it gives me more enthusiasm to do them.
Wednesday, August 5, 2009
Decopatch basic technique: torn paper or patchwork
 Recently I had a few questions regarding the Decopatch paper mache range. One of our customers, Linda, asked me if it was possible to create some step-by step instructions. It is really easy to decorate the paper mache.
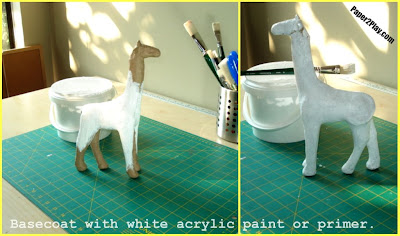
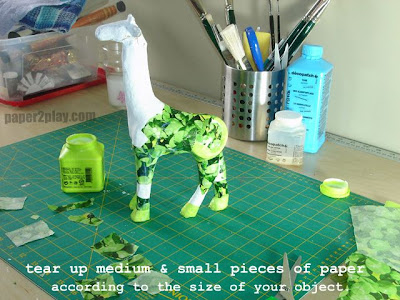
In the case of a small base, like a small paper mache animal, tear up pieces of the chosen paper according to the size. I like to tear up medium pieces. In case I need smaller pieces I then tear up again in smaller pieces. You can waste a lot of paper if you tear up too many small pieces in advance.
Pick up a piece of paper using your brush and place it on the glued section of your animal. Then brush again the varnish-glue over the paper, smoothing it from the center towards the edges. Wrinkles or bubbles may appear as you work. To prevent them spread a sufficient amount of varnish-glue over the paper, but not too much though.

I used 2 designs to decorate this girafe. Decopatch #404 and #295. Place the lighter colour first and then overlap with the darker one. In this example I started with the legs and the tail first before applying the darker coloured paper. Keep applying the glue and the pieces of paper until the entire surface is covered. The varnish-glue dries fast, so work on a smaller area first and progress consequently. From time to time, you will have a few holes while gluing. Simply spread a piece of paper over the space to be filled in.
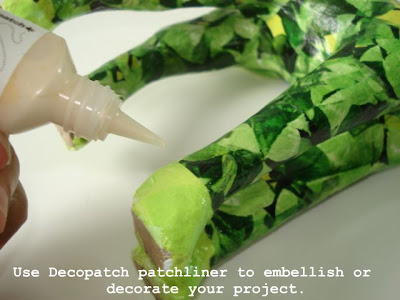
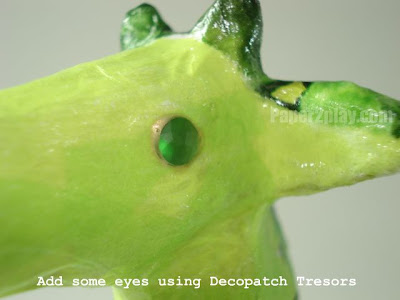
To finish don't forget to add some eyes with Decopatch Tresor accessories. Just use Decopatch liner, in this case I've used the gold one. It is perfect to enhance the cabochons and to glue them.
 Leave your base to dry thoroughly and finally, brush with Decopatch sealant. Isn't she a beauty?
 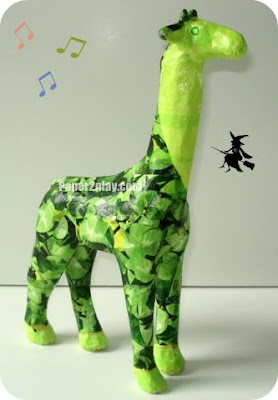 I don't remember who said that we learn best when we use two senses: reading and viewing. So for those who prefer to watch rather than read a video is to come soon!
Read More......
Friday, June 26, 2009
R.I.P Michael Jackson
I am so in shock that I do not know what to say...So many have already expressed some of my thoughts. This drawing that Michael jackson drew himself lets us know how sad his life has been.
So rest In Peace M.J!
Friday, June 19, 2009
Do you Decopatch? I do!
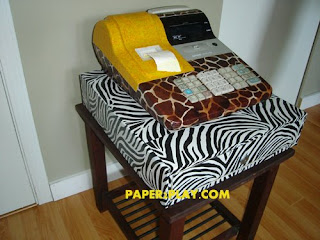
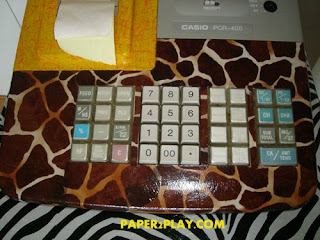
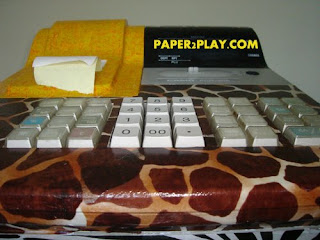
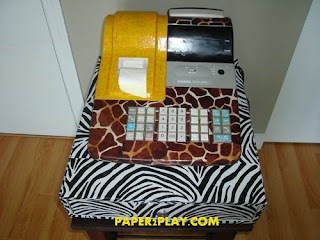
Recently I had to Decopatch an electronic cashier for a friend of mine. This electronic cashier is planned to be installed in his new store, that will open sometimes in the summer. He has a store where he sells African artifacts. He wanted something that could match with his theme in his store. Also, he told me that he was a big fan of zebra skin. So, I came up with this idea. I used the Bamako set which includes Decopatch papers #429, #209 and #297 . I needed more than one Decopatch #429 because it was applied on the larger part.
The beauty of Decopatch is that he can be applied on almost everything: plastic, wood, metal, glass, paper mache, wicker, ceramics and cardboard. Summer is already at our doors and the garage sales will blossom soon. So pick something that you want to throw away and give it a try. I bet that you'll become addicted...
The beauty of Decopatch is that he can be applied on almost everything: plastic, wood, metal, glass, paper mache, wicker, ceramics and cardboard. Summer is already at our doors and the garage sales will blossom soon. So pick something that you want to throw away and give it a try. I bet that you'll become addicted...
Friday, April 3, 2009
Decoupage napkins
If you believe a picture is worth a thousand words, how much more do you suppose a video is worth? If a picture is worth a thousand words, these videos are worth several thousand words, if they make their point while saving your time!
A few persons asked me how I do procede to decoupage. Well instead of writing to each of them I decided to videotape the entire process. I used one of my favorite paper napkin for kids and a small storage from Ikea. If you have any questions, I'll be glad to answer. I know that my blog is read by a few of you. So, please leave me your comments. I feel sometime that I'm talking to walls. let me know if it's well explained or if I've missed something. Don't forget to subscribe to my blog to stay tuned!
Part 2
Friday, March 13, 2009
Decopatch on furniture
I created a quick video showcasing a few Decopatch papers. When I started working with Decopatch my goal was to recycle old furniture. I really like the idea of applying Decopatch on anything. But my main concern is how to not throw away what we don't like anymore. Even though on this video I show decorated new piece of furniture, I want you to remember that you can do the same with your old pieces too.
I hope this summer I'll have the time to edit a video where I will demonstrate the application of Decopatch on an old piece of furniture from start to finish. In the meantime, here's the latest video:
Saturday, February 14, 2009
How to: decoupage napkins or serviette technique video
My apologies for not posting for so long... I must confess that it's not so easy to cumulate several positions in my company. Inevitably some stuff are not executed, like this blog...
Anyway, I received quite a few questions regarding the serviette or napkins technique. So first of all, thank you for reading this blog and thanks for your questions.
The most common question I had was "when I'd post a video for the serviette technique". So here it is, a new video that shows you how to apply the napkin on a base. In this first video I show you the basic application on a canvas. With the serviette technique you can easily create your own artwork.
This piece of work belongs to a collection which will be displayed at New Westminster's library during the whole month of March, on the top floor. I will showcase many pieces done with the napkins technique. I'll try to post some pics next month.
Next time I'll shoot a video which will show you another way to apply the napkin. This technique is more convenient for large bases. So stay tuned!
Part 2
Friday, November 28, 2008
Color-Dekor 180°C: A new way to decorate your china & glass

Color-Dekor 180°: Discover the new way to decorate heat resistant materials like china, glass, metal and many more. Color-Dekor 180°C is a material made of plastic foil, which is easy to punch and cut out.
It's easy to use and fun for all the family. You simply cut out the desired shape with a craft knife, scissors or craft punch. Wet and apply, and allow to dry and bake in a domestic oven. So easy!!!
So, you're wondering how does that works. It's done as follows:
- Cut your desired designs in the Color-Dekor 180°C sheet with a pair of scissors, a cutter or even a punch or anything that lets you produce decorative motifs.
- Clean the surface that will be used.
- Lay your cut out motifs in water for a short time in order to remove the protective film and then place the design on the base.
- Gently rub down on the motifs with your fingers to remove any air bubbles and water.
- Absorb excess water with a paper towel. -
- Let dry for 24 hours at room temperature before cooking in a household oven for 30 minutes at 180 degrees.
Interested? have a look at our shop. You will find the sets of 4 colours or set of 2 colours. Dimensions 10x20 cm.
A few ideas with Color-Dekor 180°C:
 (clic the pic to enlarge)
Read More......
Wednesday, November 12, 2008
Home Deco: choose a theme

Like every great artist, choose a theme. You can get inspiration from the decor of the room where you are going to hang the painting: Zen if your style is minimal, African if you have leopard-skin cushions, or Return to India if you have a colonial trunk and some elephant statues. For a child’s room, go for a cheerful design or something tender. For the bathroom, a marine style. In the kitchen, put yourself in a rustic country mood.
Create several related frames
One of the principles of Home Deco is to create several related frames and hang them together.
For example:
Vary the same painting by changing one or more elements: an apple on a yellow background, on a red background, on a blue background. A flower which is a bit more open in each frame. A frieze of butterflies: blue, red, yellow. Or several identical frames, hung at the same level, of a daisy on a pink background.
- Begin a drawing in one frame, and continue it in the next. The motif is only broken by the space between frames, placed side by side without touching.
- Write a name or a short text. Use small frames placed next to each other. Between the frames with the letters, you can put frames with painted designs.
Read More......
One of the principles of Home Deco is to create several related frames and hang them together.
For example:
Vary the same painting by changing one or more elements: an apple on a yellow background, on a red background, on a blue background. A flower which is a bit more open in each frame. A frieze of butterflies: blue, red, yellow. Or several identical frames, hung at the same level, of a daisy on a pink background.
- Begin a drawing in one frame, and continue it in the next. The motif is only broken by the space between frames, placed side by side without touching.
- Write a name or a short text. Use small frames placed next to each other. Between the frames with the letters, you can put frames with painted designs.
Tuesday, November 11, 2008
Material Home Deco- 1st part
Ok! you want to start your first Home Deco project. So what do you need? Here is the basic for this technique. I'll look over the material needed:
BACKING
The frames: Prepared canvas stretched on a wood frame (flat or 3D). Some frames are already factory stained (natural, black, grey,...) The shims included allow the canvas to be restretched at any time.
Canvas Board: Prepared canvas over solid hardboard.
Other: Other rigid backings can also be used: boards, foam board, the backs of old frames. With Home Deco, you can stack or juxtapose several frames in order to create volume!
BRUSHES
Natural Bristle Brushes:More expensive, and not as long lasting, they are not used in Home Deco except for fine work with tapered tips for painting tiny designs or for writing.
Synthetic Bristle Brushes:Considerably less expensive, ideal for acrylic paints. Available with round or flat bristles.
Tip: To clean brushes which have hardened, soak them in a concentrated solution of laundry detergent brought to a boil or in boiling vinegar (softens them up).
ACRYLIC PAINTS
Acrylics have the advantage of being water soluble, fast drying (which allows several coats to be put on quickly), very sturdy and waterproof. They are elastic, so they won’t crack if they are put on in thick layers. They have strong colors, and can be put on as is, or thinned.
STRUCTURING OR MODELING PASTE
It gives your creations depth!
It comes in a number of forms—super-fine, fine-grain or heavy—depending on the effect desired. It can be mixed with paint, pigments, sand, etc.
It can be spread with a palette knife, a spatula, or a trowel, depending on the desired effect, and worked with a stucco roller, a fork, a toothpick or other tool! You can work in various light items while wet such as grit, beads, tiles, pebbles, smooth stones, or shells. Drying time depends on the thickness of the design. After drying, it can be sanded and/or painted.
I'll extend on modeling paste in a next post.
Tip: Speed up drying time with a hair dryer!
Wednesday, October 29, 2008
Home Deco technique - introduction

Attractive paintings to hang throughout the house. This innovative concept launched by Pébéo® relies on the use of professional art materials such as frames and painting materials (acrylics, glazes, gesso). The appeal of this technique is its combination of materials, colors and contours.
You can make them easily yourself, to match your interiors, or perhaps your mood. A little paint, a few tools, lots of inspiration and you’re on the way to a decor which matches your personality. Because it’s also inexpensive, (just paint and canvas) and easy, you can change your decor according to the seasons, your feelings or your dreams. The Home Deco technique allows you to create your paintings with only a few art skills. The technique is easy: you just need to buy a mounted canvas (available in craft stores), some paint and accessories (beads, photos, threads, leaves, string). In this first part I will talk about the materials.
First, start collecting those little items you find interesting.
A stroll on the beach? Collect pebbles, dried seaweed, driftwood, sea glass, sand, shells,...
A stroll in the woods? Pick up little stones, dried leaves, bits of bark, moss,...
A stroll through your garage? Don’t throw out old nails, bolts, keys, washers; they are still useful!
Spring cleaning? Treasure those bits of strings, ribbons, buttons, cloth scraps, leftover wool. The examples are endless; I’ll stop here!
Supplies needed
- Stretched canvas
- Gesso acrylic undercoat
- Smooth modeling paste
- Fine grain modeling paste
- Coarse grain modeling paste
- Metal spatulas for embossing
- Set of notched tools for embossing
- Acrylic paint
- Brushes
- Embossing paint
Read More......
- Stretched canvas
- Gesso acrylic undercoat
- Smooth modeling paste
- Fine grain modeling paste
- Coarse grain modeling paste
- Metal spatulas for embossing
- Set of notched tools for embossing
- Acrylic paint
- Brushes
- Embossing paint
Tuesday, October 28, 2008
Metallic Foils for Home Deco or 3D Art
Finally I received my new stock. I am thrilled to bring you some products that will enliven your artwork. I try to find & import products which are not mainstream in North America. Most of them actually come from Europe, and that's why it takes time to replenish sometime! Well, enough of business stuff. Today I will showcase the Metallic Foils which come in various colors. We have 8 colors in stock: gold - gold glitter - silver - silver glitter- red - red glitter - blue - blue glitter - copper.
How To:
Apply MagicArt on your surface and let it dry until it becomes transparent. Then place the (brighter side toward you) color side of the metallic foil onto the glue and rub the sheet with your fingers. Press firmly. Once done, remove the sheet. The shapes you have previously draw will be colored.

Thursday, October 9, 2008
I did it!
Time flies so fast, I can hardly believe that I haven't written anything for a month. I must confess that I am not a big fan of writing! That's the reason why I take too long to write the articles. So maybe I just have to find something I'm more comfortable with. Also, let's pretend you're not here for the writing, but more for the pictures or steps-by-steps projects.
The life of an entrepreneur is not rosy everyday, however one of the great advantages is that you do what you want to do. There are no orders from a boss, you are THE boss. And that is definetely the icing on the cake! And I love it! So I'll try to post more pics than writings because there's no boss who asked me to, right?
The life of an entrepreneur is not rosy everyday, however one of the great advantages is that you do what you want to do. There are no orders from a boss, you are THE boss. And that is definetely the icing on the cake! And I love it! So I'll try to post more pics than writings because there's no boss who asked me to, right?
One of my passion, is to give a new life to second hand furniture. The second one is to create nice and colorful room-dividers. Being my own boss, allows me to do what I like to do. I love the papers. I will transform any discarded piece of furniture with beautiful patterned papers.
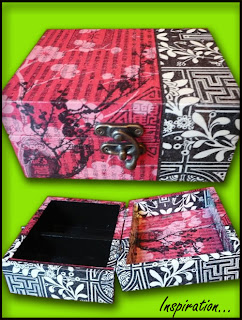
Besides papers I enjoy working with the paper napkins. In fact they are so easy to use. One of the main advantage is that you don't have to know how to draw. It's as simple as 1, 2, 3. Take a look at this box below. A simple wooden box becomes one of the most beautiful gift you can give to a dear one. The holiday season is at our door. So start now to create that gift that will make you say: I did it!
Read More......
Subscribe to:
Posts (Atom)


